PAYMENTS: Lutz Multimedia LLC takes all forms of secure payment including virtually every payment app on the app market. Please call for App Market Payments or secured Credit Card Payments through Square Point Of Sale Processing (all Credit Card info is stored on the Square Server and is government grade encrypted for your security).

© 2023 Lutz Multimedia | All rights reserved

ProTools and Apollo Interfaces: How to make UA’s Matrix I/O and PT’s I/O Play Nice!

My favorite musician quote is by Jeff Buckly, “There’s music… and thene there’s waiting to make music.” When the gear fails us or is problematic it can be incredibly frustrating and time consuming. Inputs and Outputs (I/O) seem to be an ongoing issue, especially when getting Protools and UA Console to perform flawlessly.

The latest in Universal Audio’s  Interfaces are the X series converters are a massive leap in evolution in the series product line of high end audio interfaces. The new D/A and A/D Conversion is wider and deeper than ever before and stands out from the herd of interfaces we’ve tested as the new leader of the pack. I feel like this is the first time we can finally hear what the commercial studio converters like Prism and Burhl  sonically offer. The veil is finally lifted from consumer end conversion with the X series.

But what about when the software I/O that comes with your new Apollo (called UA Console software) doesn’t sync up with ProTools? Getting the UA Console software and ProTools to play nice is not always easy, especially when you use multiple units or more than the 32 channels allowed in regular PT (PT throttles voices and channels until you buy their HD ultimate subscription).

Arguably, one of the toughest things about setting up multiple Apollo’s is the Matrix I/O. The key is that all the channels match in here and again in ProTools, together! Syncing the proprietary UA Console Software’s “Matrix I/O” to ProTools “I/O settings” can be tricky Ricky so I’ve cracked the code and laid it out for you here as simply as possible.

FIRST STEPS

If you have multiple units, start by first daisy chaining your Apollos together via thunderbolt. Note that  Thunderbolt 2 and 3 compatibility hurdles can be resolved with a TB2->TB3 dongle successfully. There is no loss of data or speed and thousands of users report no issues with this solution. In fact, UA recommends it when needed between older units and new ones.

This info is very hard to find online so I consolidated it all for those in need.

TURN ON YOUR STUDIO ENVIRONMENT IN THIS ORDER TO SYNC EVERYTHING PROPERLY

Computer first, Primary Apollo next, followed by Apollo Twin Controller. Main Apollo should read “INT”, which means the internal clock source and is the one the whole session is running off of this one. Twin controller or secondary unit should read “EXT” for external slave unit. Primary should be the highest model converters (so X series in our case). Now you can turn on UA Console software. Turn on UA’s Console software first, double check sample rate (make sure when session loads, they are both in sync with bit depth and sample rate. If they’re off, update both programs or try a fresh re-install. That works most of the time to fix any issues). Turning on in this order ensures External remote syncs properly and they won’t get stuck, as they occasionally do on the wrong clock source.

THE THREE KEYS:

The key is that until you have Console software I/O Matrix set correctly (see screenshot), PT will “default” PT I/O all wrong and you’ll be pulling your hair out. The other key is that channel numbers are what need to match up in the Console’s “I/O Matrix” with your protools I/O channel numbers. The last key to the puzzle is Pt only allows 32 channels (unless you have Elite HD version).

I have spent almost 2 decades perfecting and curating what I think is the perfect way to sync multiple interfaces and label your I/O intuitively for your recording studio. My setup is a new UA Apollo X16 (on Thunderbolt 3) with an XTwin which is used only for monitor control, TB and the two sets of alt Monitors as a remote. Tens of thousands of other studio owners use this popular setup but getting the Matrix I/O in UA’s Console software to shake hands with ProTools I/O is the real hat trick.

Start in Console FIRST. You’ll want to get that I/O Matrix setup before tackling PT I/O setting. Both need to match, that’s what it’s all about.

IN CONSOLE SOFTWARE:

Check out the Console Matrix I/O setup in the screenshot below. The key to this whole tango is to have your Matrix I/O match PT’s I/O exactly. You can have up to three monitor sets with the x16. The first will go out the regular XLR outs of the X16 on the rear. The second, as the manual says, MUST go out 1-2 (accessed with the ALT button on the Twin) and the third is forced on to Line Outs 3-4 for your alt monitors which you access with the FCN button on the Twin (for say, a pair of NS-10’s). * UA Rep said he wishes this was assignable, alas it is not.


PRO TIP 1: Other users report issues with them getting locked out of EXT and switching to INT if turned off in wrong order! I’ll say it again so you never forget; turn on the master clock unit first, and then the remote (external sync) module. Users can get stuck there and think both or the wrong unit is master (INT clock source). This can cause buzzing and strange noises.

PRO TIP 2: Make sure the hierarchy in Console software “Hardware” settings are correct. Mine weren’t and I couldn’t figure out why monitors wouldn’t play sound at first! Turns out it was because The Twin was on top of the X6 in the hardware settings tab  and was therefore set to the clock source. This forces the monitor outs to be from the little Twin and the system ignored the x16 monitor outs. Put the x16 (with the better converters) as clock source and “on top” in console hardware settings. To do this simply click and drag the hardware picture to the top of the list in the hardware settings tab! Don’t forget to urn him on first and off last too.

On older macs you need to have Apollo units on before your Mac, I was told by UA this isn’t necessary with new units anymore.

PRO TIP 3: As of 2021 there’s an occasional noise / buzzing glitch in the system that can be fixed by changing the sample rate in the Apollo Console app. If I was running a session at 48k, I’d just change it to 44.1 and then switch back to 48k and this can reset the converters and clear out this glitch and others!

Now with multiple units, Pt only allows 32 channels and you now have got too many so you need to pair things down in Console software (See screenshot of how we set it up. Works awesome).

IN PROTOOLS:

Before we set up your new I/O, it was recommended to me to turn off any tracks in the session you have open. Select “None” for all your ins and outs. This will make sure I/O pulls console I/O cleanly without mistakes from PT.

PRO TIP 1: Hold alt (option) key while clicking “None” to make all tracks none. You can hold alt again to make them all the same for whatever you choose. Alt is an “everything” assignment quick key.

Next, open your PT I/O settings from the setup tab. It looks like Dante’s Inferno. Take a deep breath, you got this. First, highlight and delete all existing I/O by selecting it and deleting (ins, outs, bus, inserts). Click default button on the bottom of this screen once all channels are removed (on each tab up top, ins, out, busses, inserts) and it’ll pull all the above into PT seamlessly… Tada! Why did this work so flawlessly? Because you set it up correctly in Console!

Next, rename the following and create sub-paths in outputs (note * Ins will create a sub-path for you automatically, but NOT the outs, do it manually). Select the path, it’ll highlight in blue, then click “New Subpath. Select 2 Mono channels.

Click an image to expand and study. These are from an Apollo X16 and a daisy chained Apollo Twin which we use strictly for TB and monitor control.

To further confuse you, the latest non-legacy versions of PT no longer have sub-paths for your outputs anymore (see screenshot below, no drop downs…?). The sub-path button has been removed in later versions of PT for output tab only. If you can’t subpath, use this setup of dual mono channels under each stereo pair. They’ll show up correctly on your mix and edit windows. If yours works with subpaths, ignore this.

Do you have a different way to run your patchbay and I/O setup? Post your ideas in the comments below. This is something we are looking forward to seeing fixed in future PT versions.

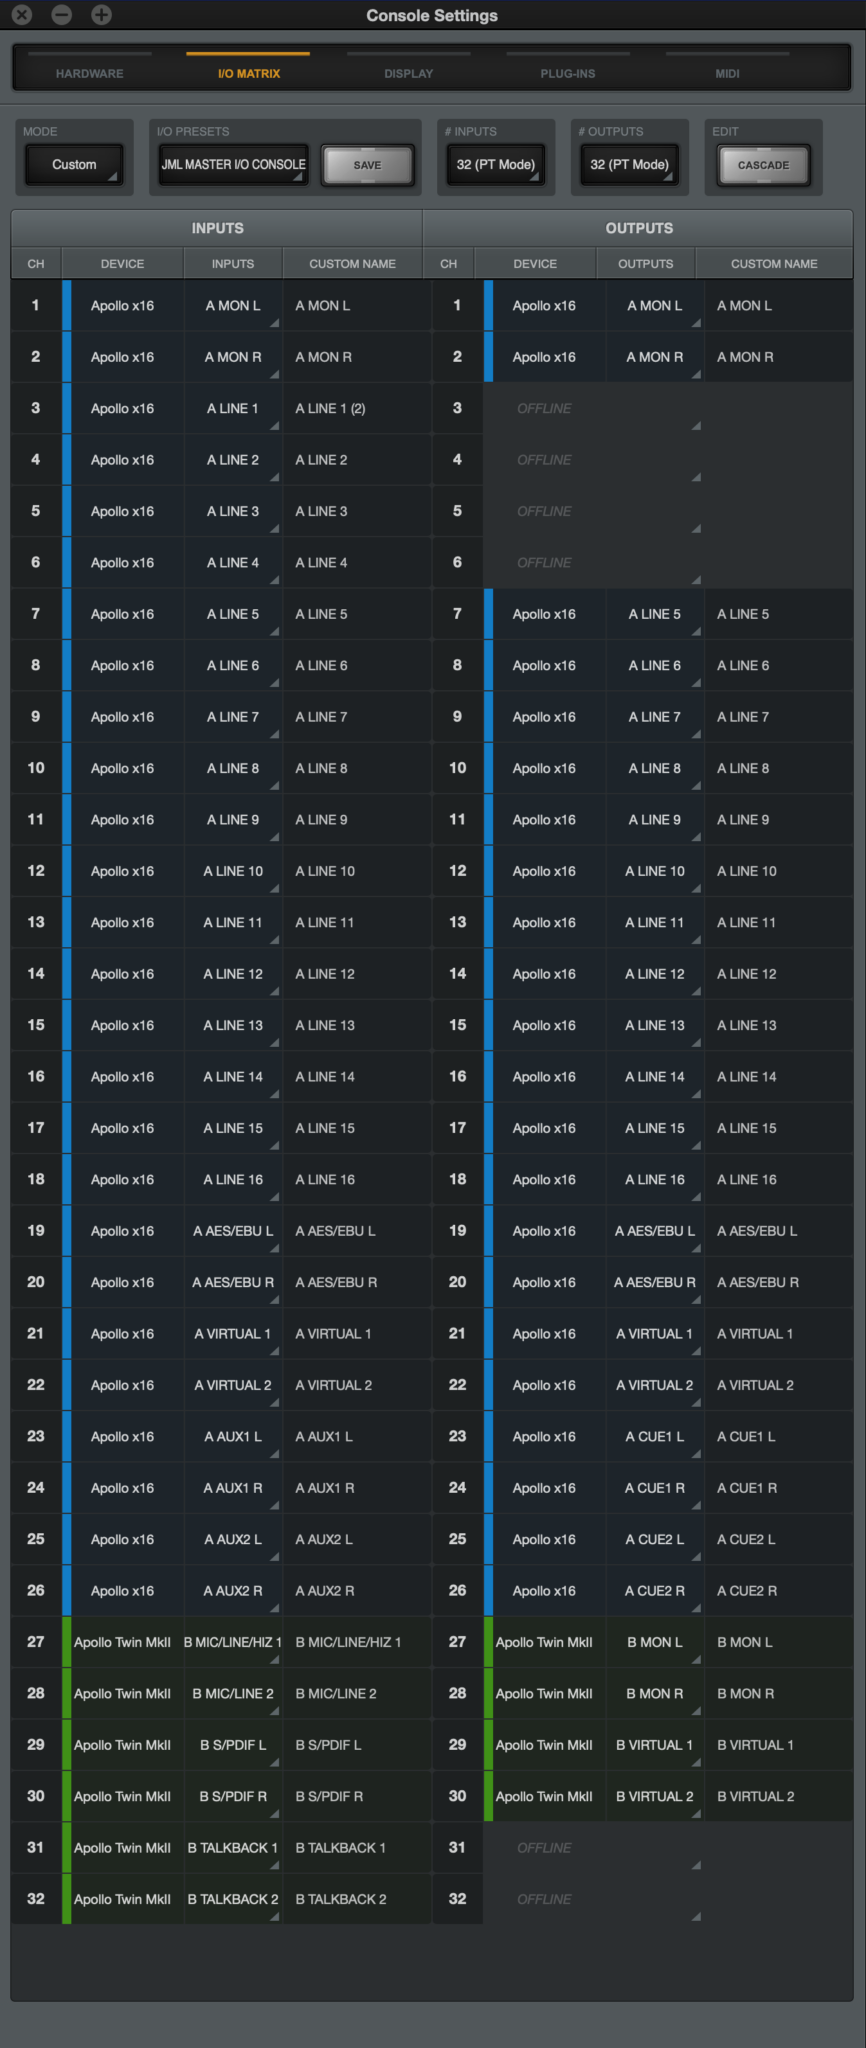
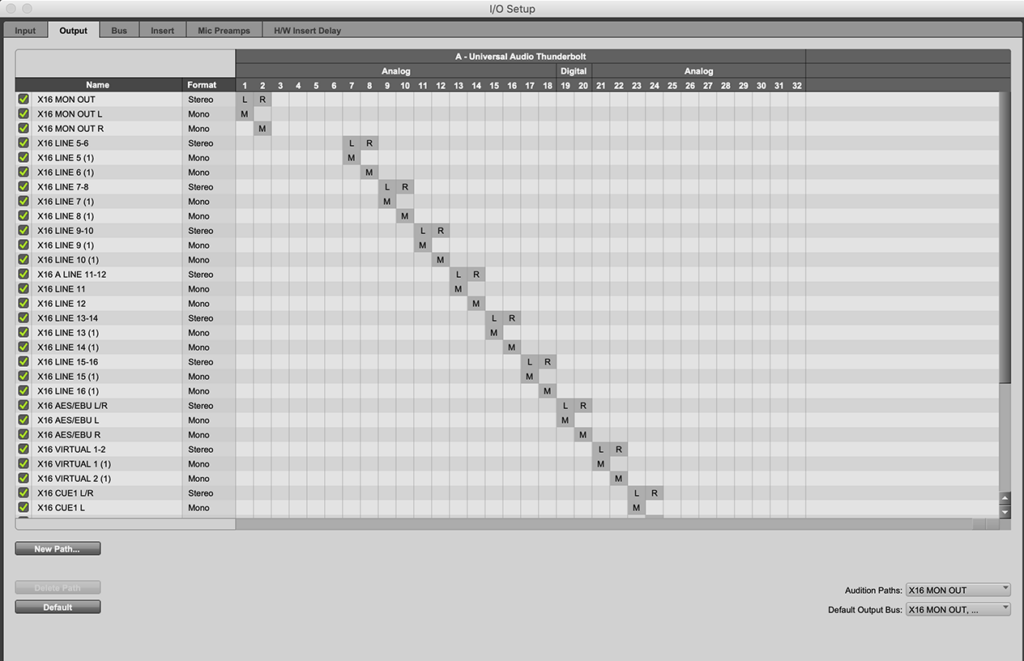
Remember, Monitor Out of the X16 in Console Matrix I/O is set to 1-2.

All channels must match on both PT and Console right? That’s the key! So therefore:

Line out 1-2 in PT should now be ALT 1 monitor
Line 3-4 should be set to ALT Monitor 2
5-16 are your outputs.

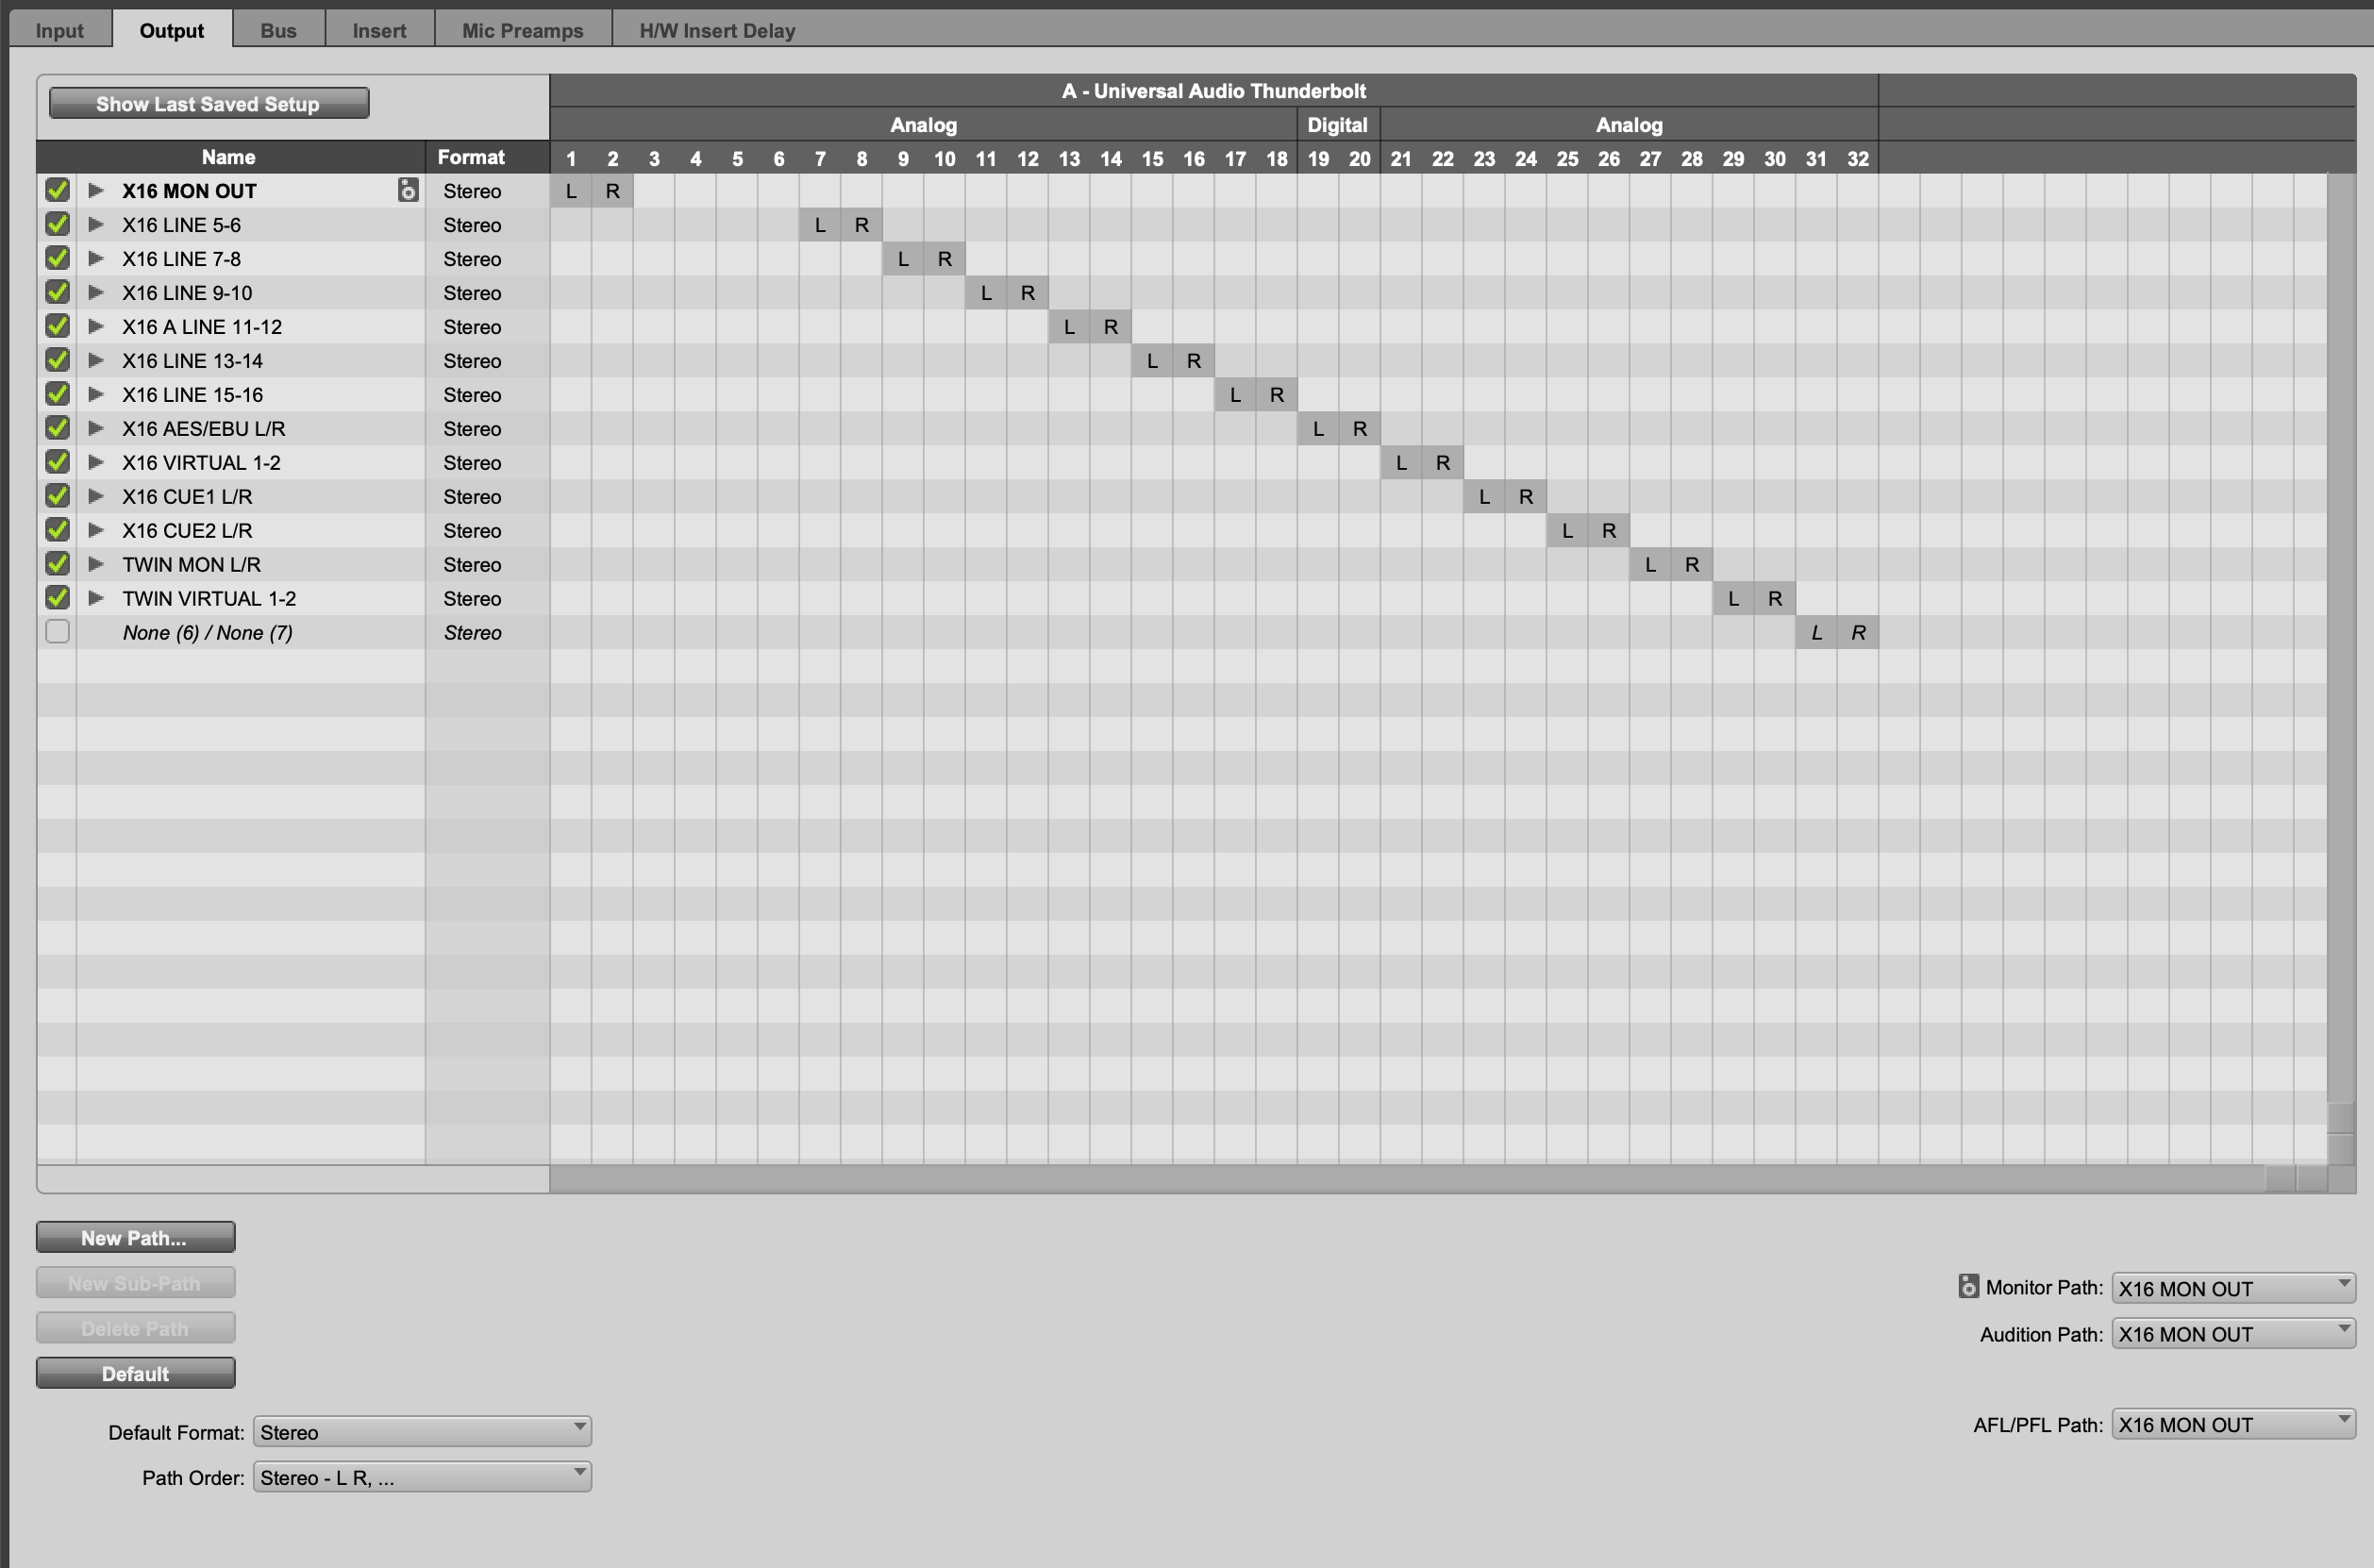
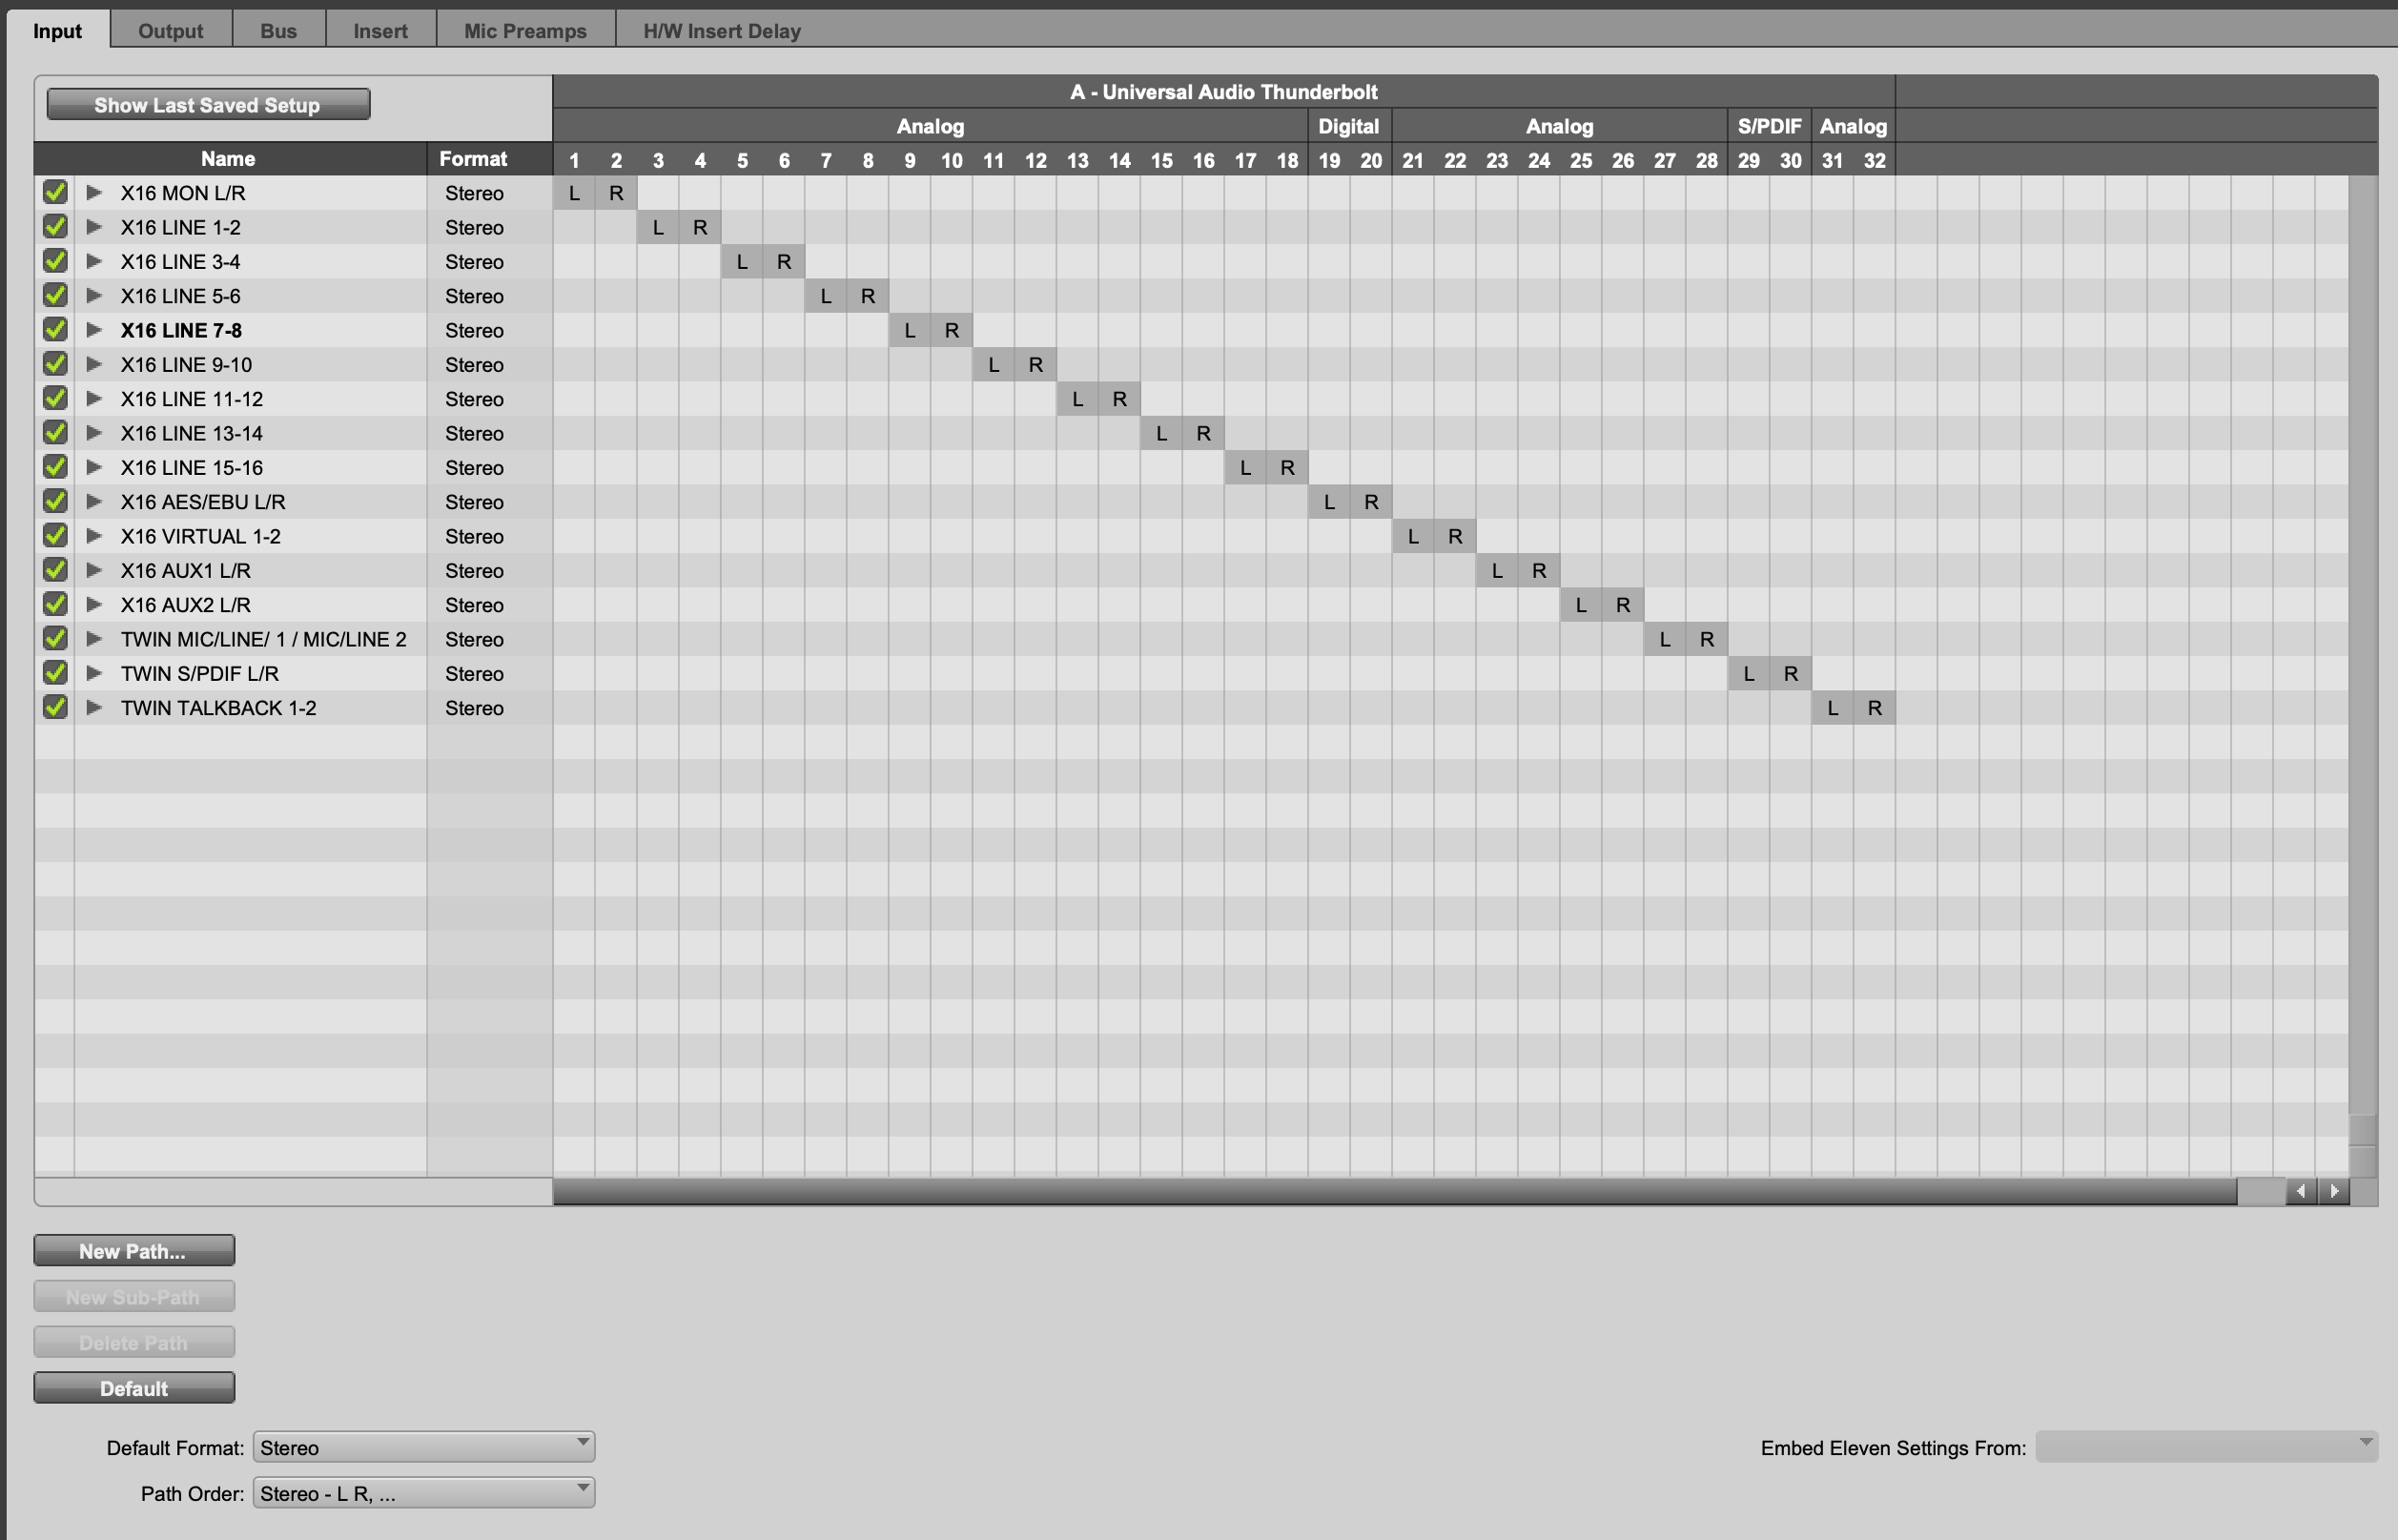
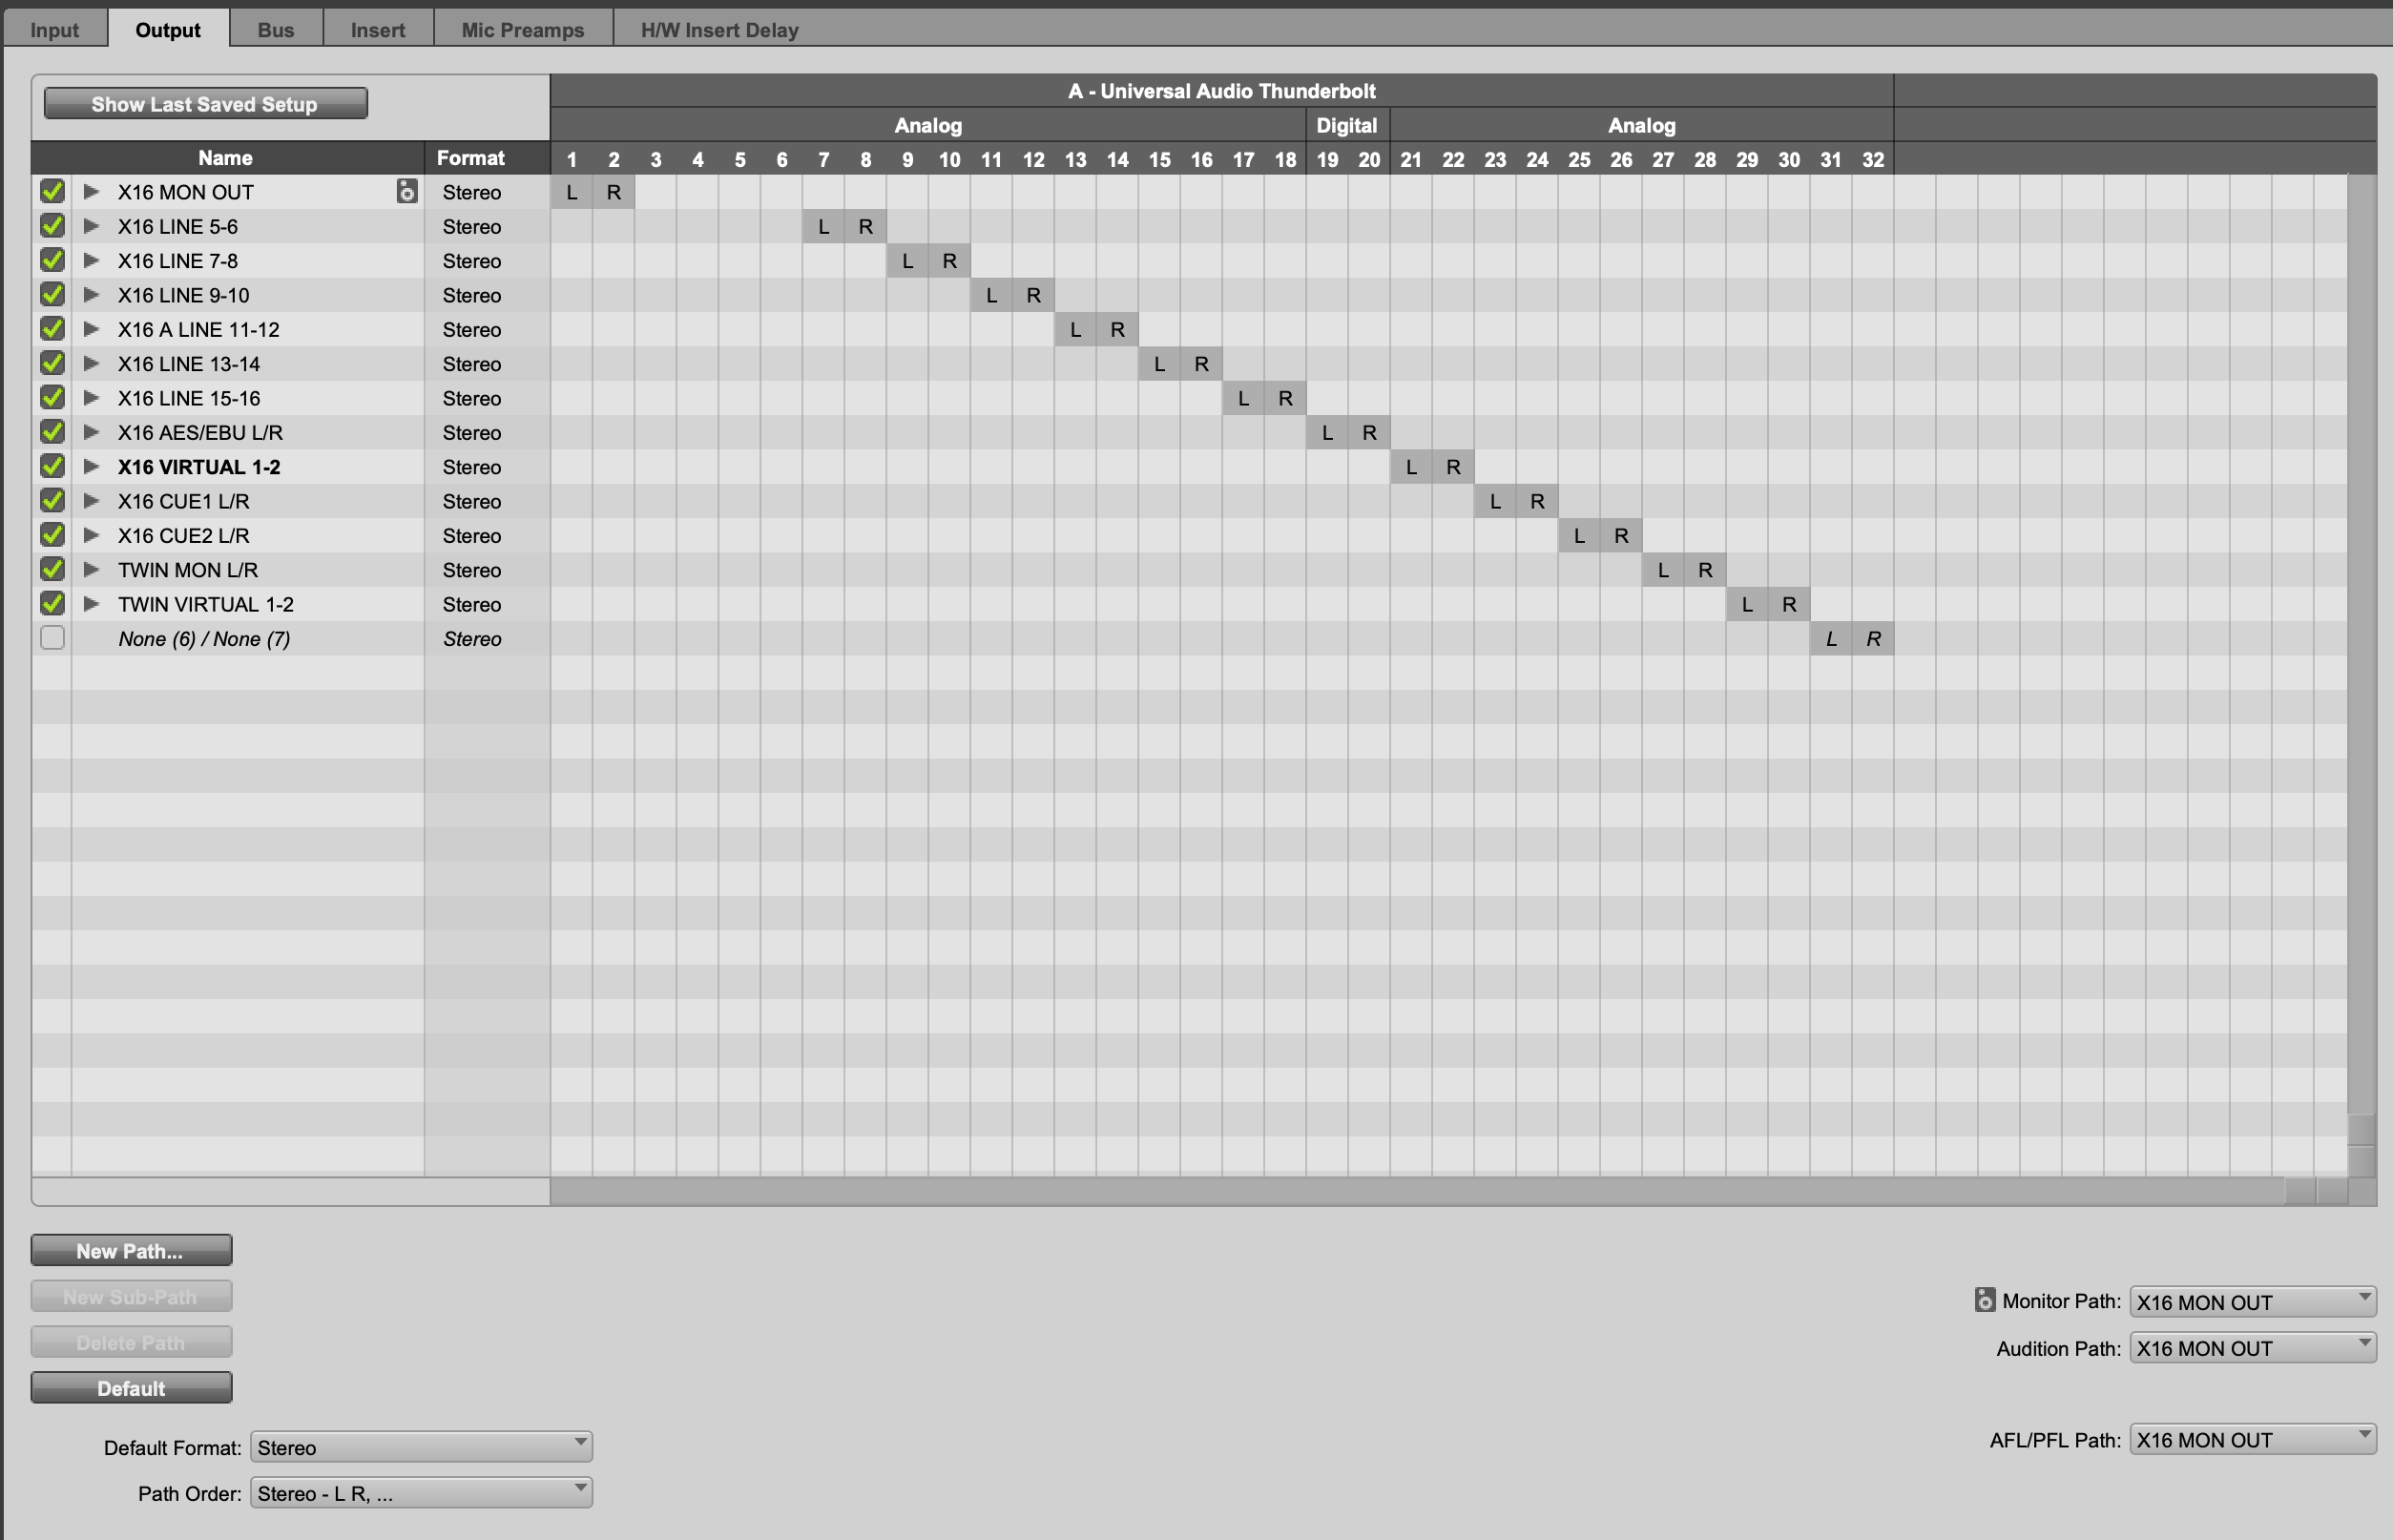
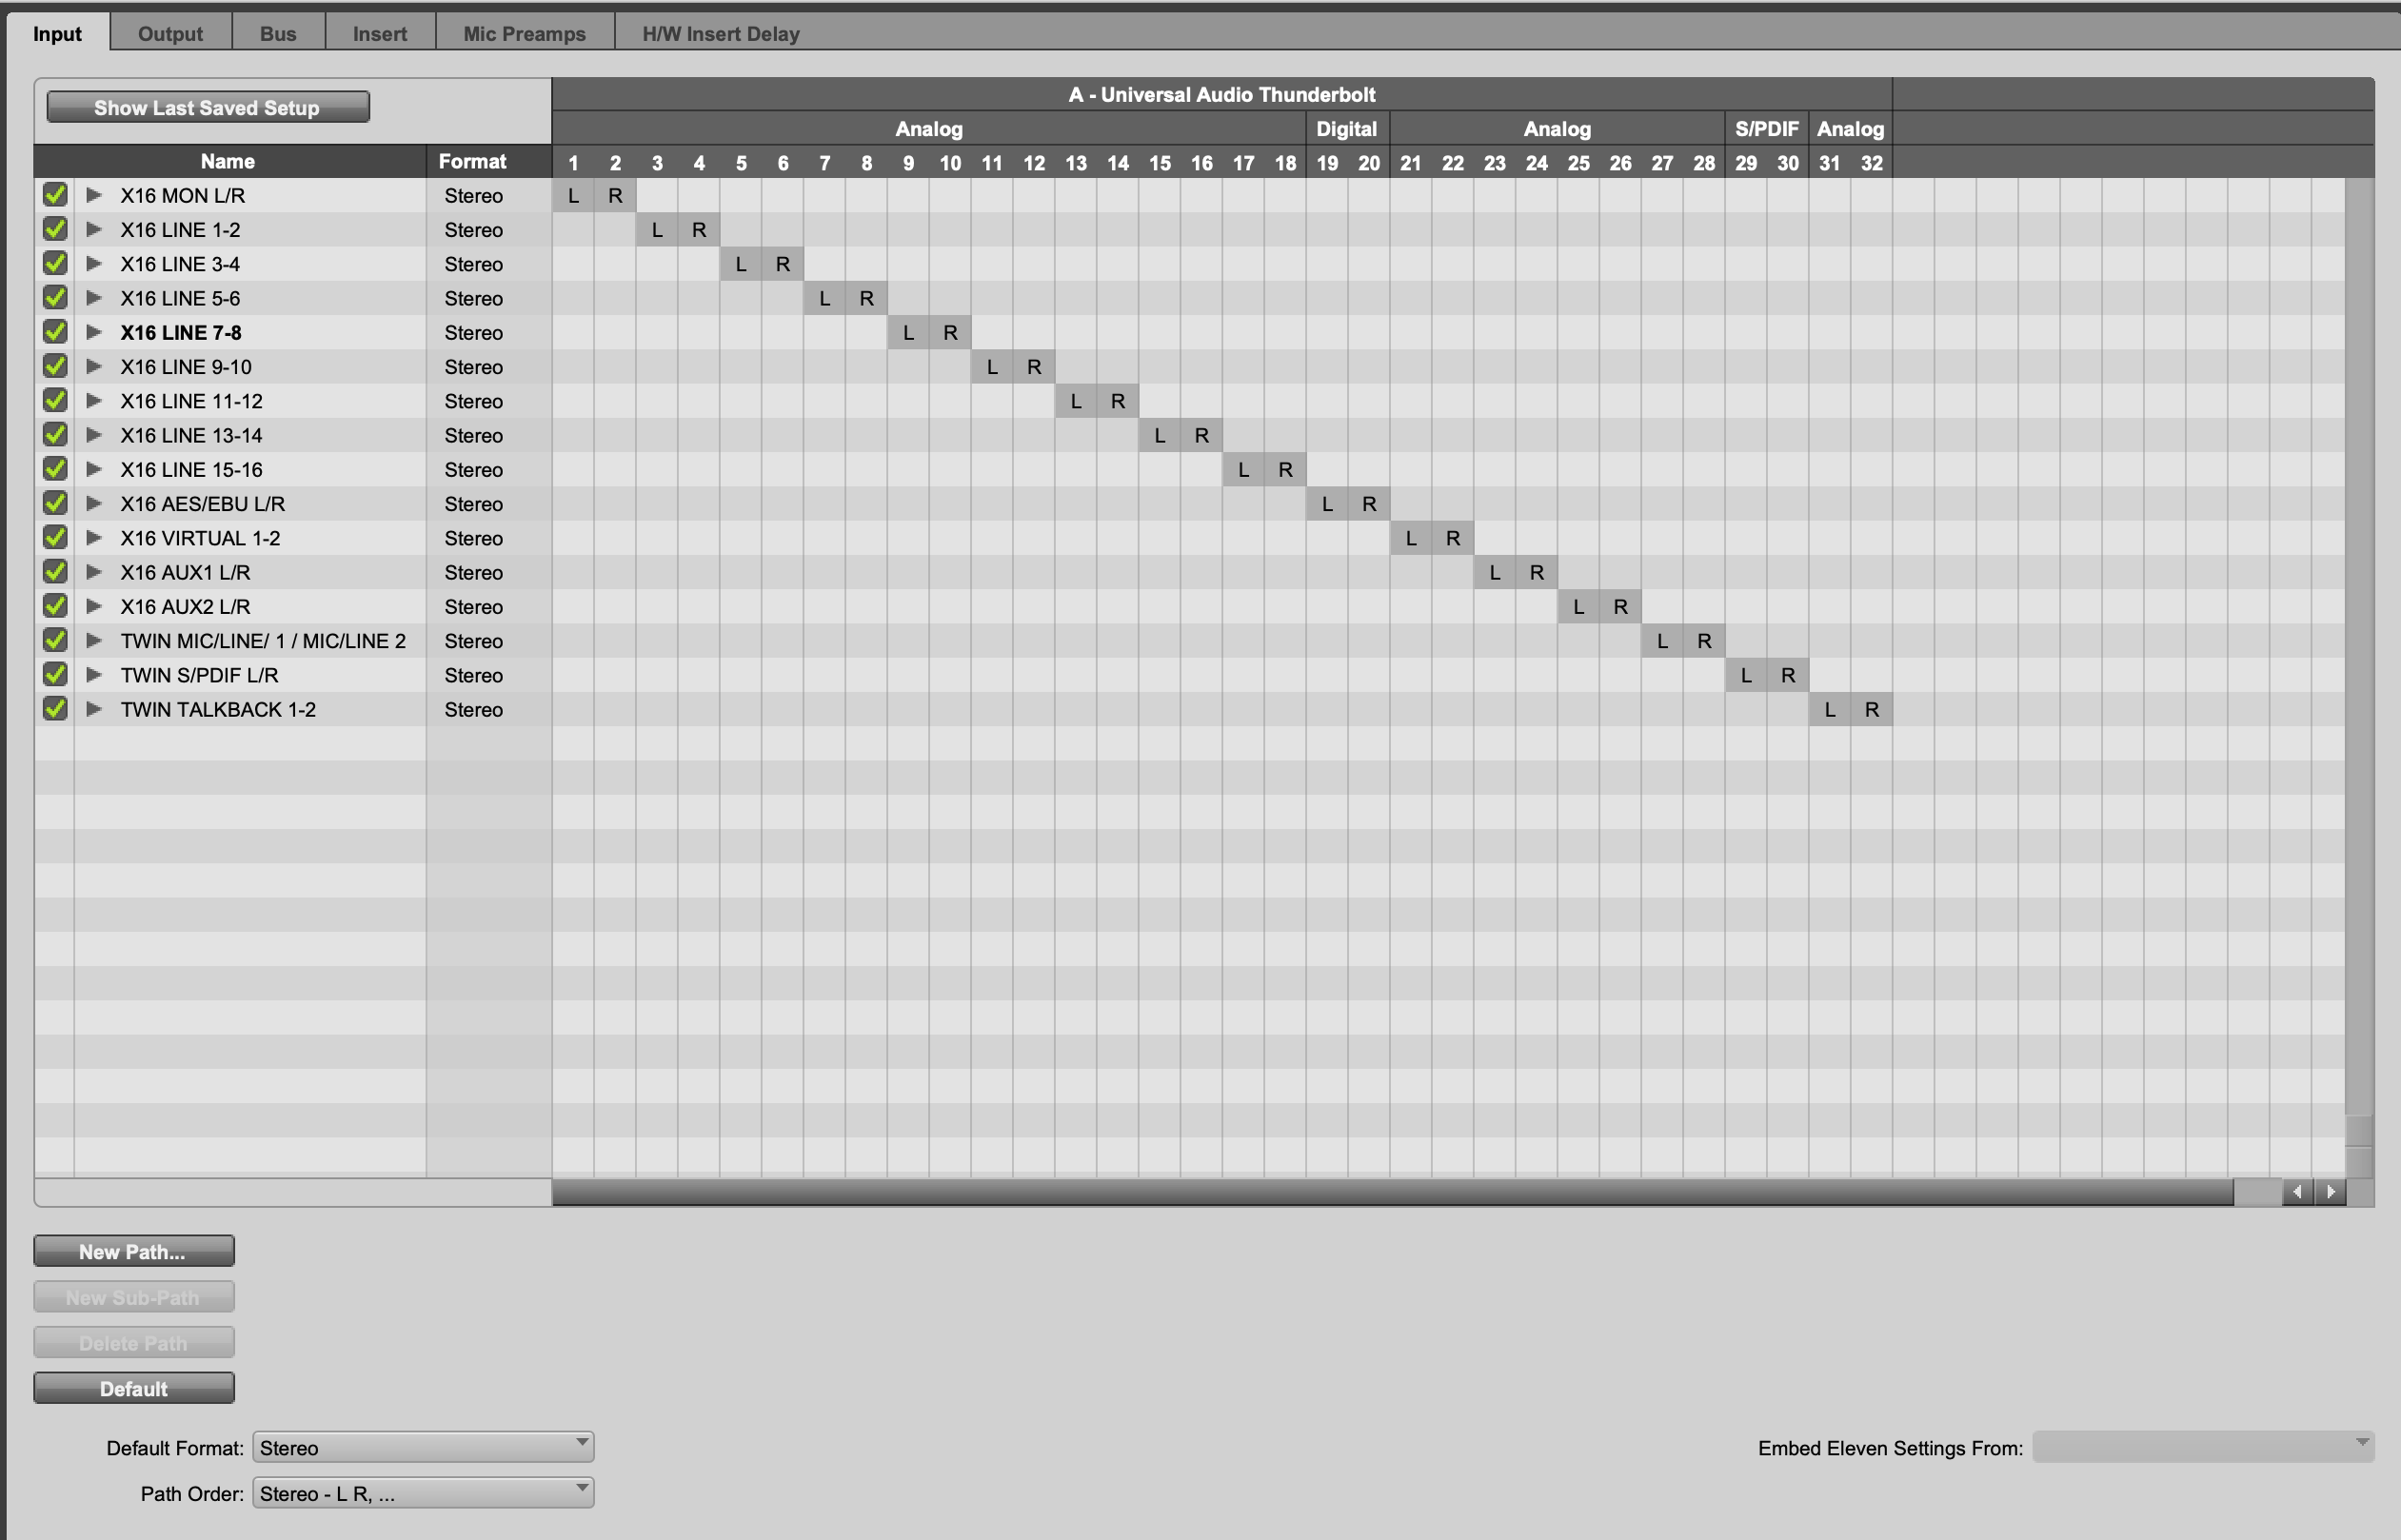
Next, rename them accordingly. The x16 will show up as “A.” The letter A will be in front of all your ins and outs and other units will be “B” and so on. I recommend changing “A” to “X16” and “B” to “Twin” or whatever you have. This helps in a room being used by more than one person so others can identify the units too.

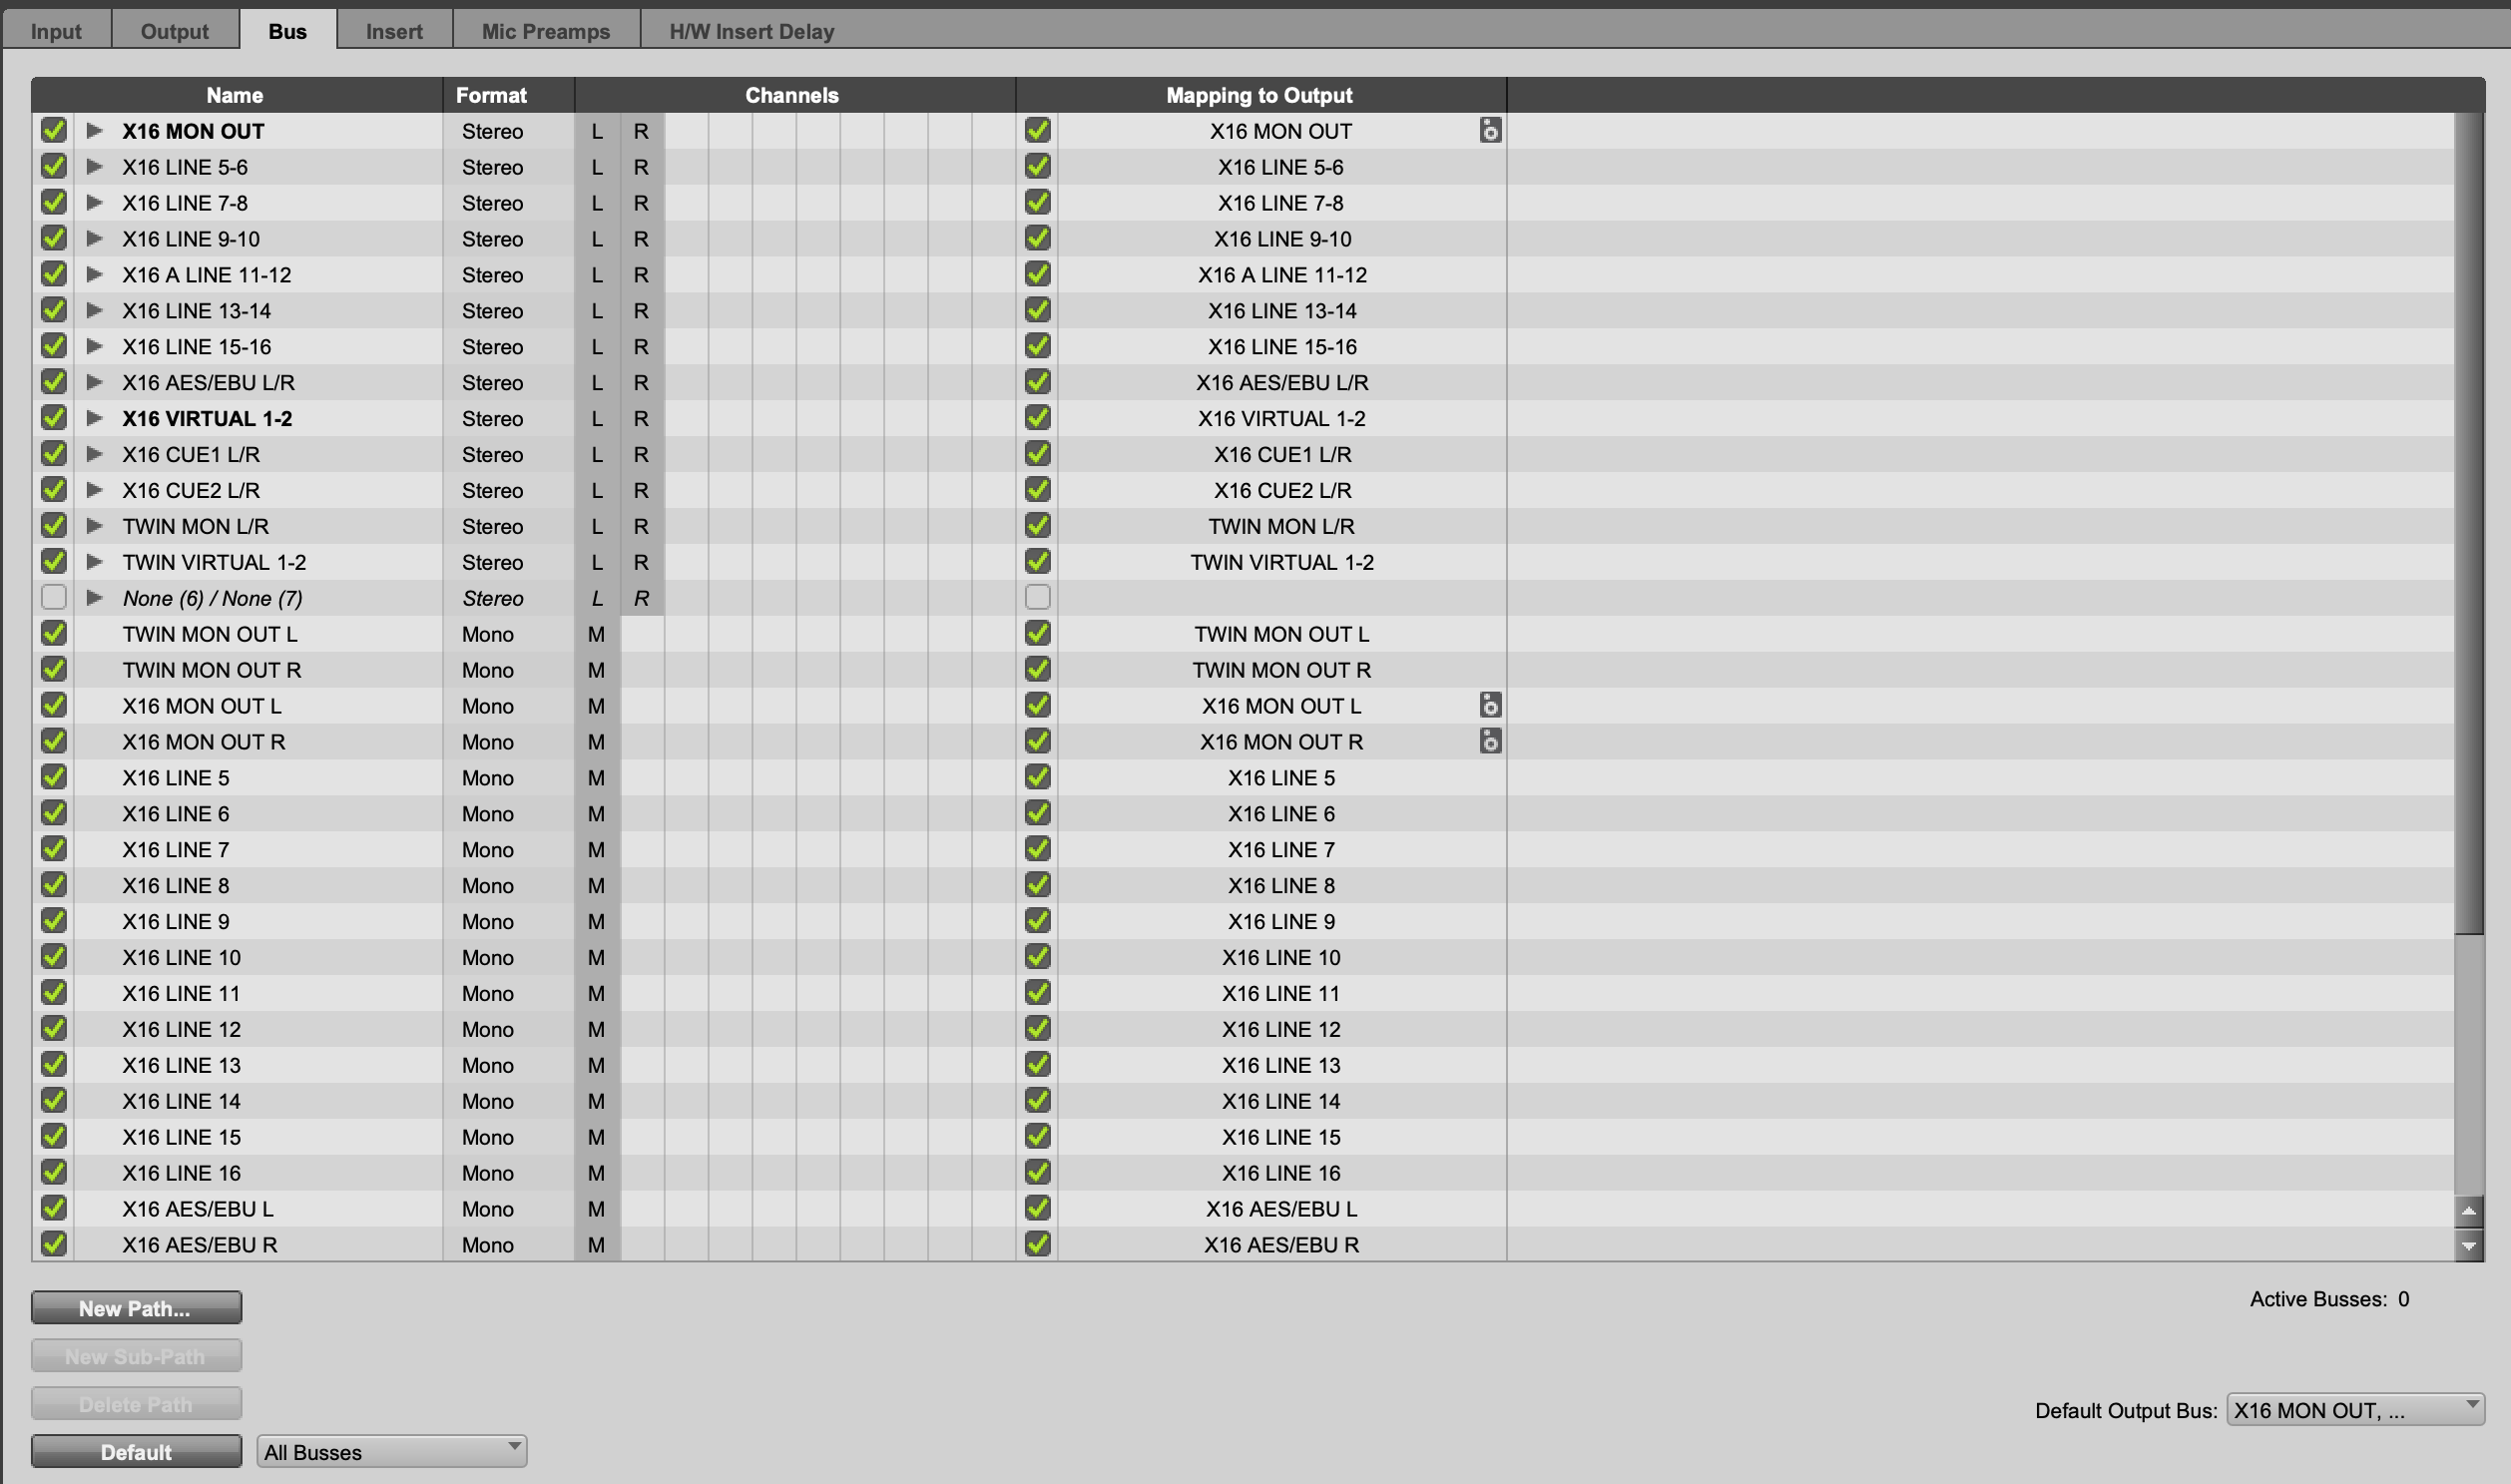
Next make a subpath for your outputs. Create 2 mono paths for each channel to do this correctly.

PRO TIP 2: Your headphone cues in console (you have 2) will have their cue source set to “Mix” by default. This means the musicians will hear whatever you hear in the control room: the mix. But maybe the drummer doesn’t want to hear digital drum track and others do? You need to make a cue1 send for everyone and a Cue 2 send for him. I recommend setting Cue 1 to “mirror to output” lines 5-6 and send your alternative Cue 1 mixes down that path by inserting a send on the drum track, for insistence, to 5-6 and use that send fader to dial in the right amount. I don’t like using Console too much, most people find it cumbersome too but I do like this feature.

Lastly, “Export” your settings so you can import them into future sessions if need be!

PRO TIP: When you export PT I/O settings it saves all 6 tabs (ins, outs, inserts, bus, etc) but when you Import, it only imports the tab you’re on so you’ll have to import each tab individually. This is so you can upload just inputs, for example, and not mess up other tabs like outputs or busses.

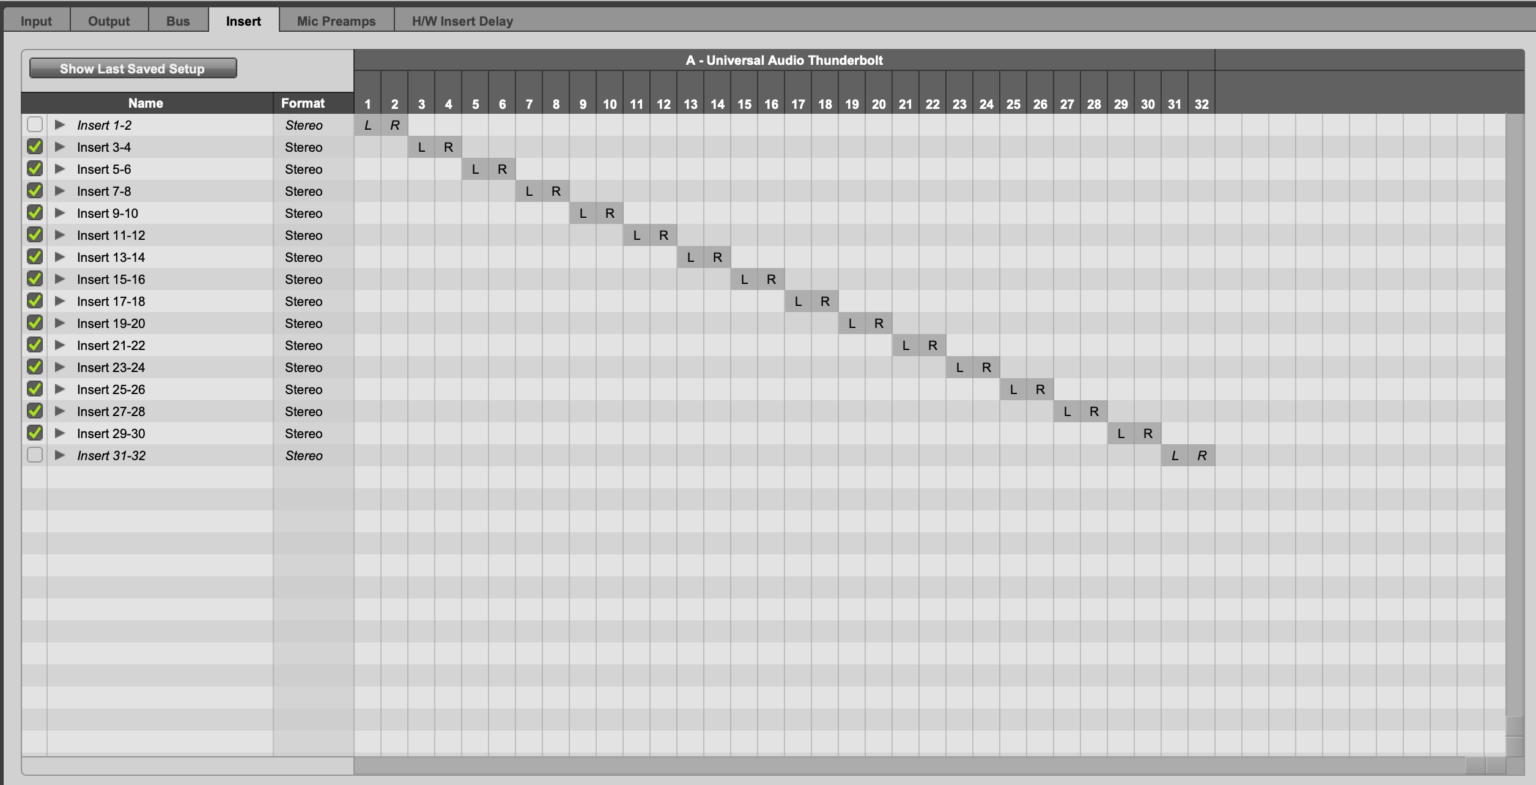
TURNING OFF SOME CHANNELS: This part was toughest for me at the beginning. Note that in the screenshots of outs and busses I turned off “None (6) / None (7)”. This should be done on your rig too. In I/O Matrix 3, 4, 5, 6 outputs are off too because 1-2 is alt monitors and you want the rest of the channel numbers to match and load the same in PT I/O so you’ll have to shuffle them into this order to get hat to happen (screenshot). Cascade mode helped me a lot here, look it up. Inserts 1-2 should be turned off in PT I/O too so they don’t show up in mix/edit window with any of the other turned off channels.

Check out the screenshots for my new I/O Setup, I wish I had these screenshots when I was attempting to slave multiple UA Apollo’s.

Good luck! I really hope these tips help some one else. Post other tips here in this thread that I missed that helped you too! Big shoutout to Warren at UA for taking hours with me to take me across the finish line and fill in the gaps.

If you are still lost or this tutorial seems beyond your understanding, I highly recommend trying one of the thousands of remote Protools guru’s that will remote in to your computer, take control of your mouse (through TeamViewer or similar program) and set this all up for you and explain it for a nominal fee. UA is great with customer support too so give them a shout if you get stuck.

Don’t get frustrated with it, you got this!

Lutz Multimedia LLC is a top tier creative studio specializing in ultra high end visual and audio content design & production.

Check out our new poolside 1200 sqft commercial recording studio, 15 minutes from downtown Manhattan NYC – Click the logo to learn more:

ssl certificate

Latest Sounds

Contact

SALT ZINE BLOG

Also available in DIY Zine format upon request. Sign up below and we’ll occasionally send you some pretty rad blogs related to art, music, design and audio engineering.

Subscribe

© 2024 Lutz Multimedia. All content is copyright Lutz Multimedia and BMI Publishing.

Start typing and press Enter to search

Shopping Cart